🔑 Prerequisites
-
Access to the Brother Web Management (Web UI)
-
Administrator login credentials
-
Botdoc SMTP username and password (provided by Botdoc support)
- GoDaddy Class 2 Certification Authority Root Certificate file (.pem format) - Download at https://aboutssl.org/go-daddy-root-certificates/
1️⃣ Install the GoDaddy Root Certificate
The Brother device must trust the GoDaddy Root CA before connecting to Botdoc SMTP.
-
Go to: GoDaddy Root Certificates - https://aboutssl.org/go-daddy-root-certificates/
-
Download the GoDaddy Class 2 Certification Authority Root Certificate in PEM format.
-
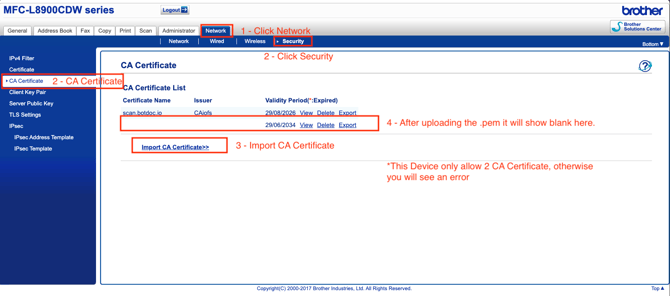
In the Brother Web UI, navigate to:
Network → Security → CA Certificate
-
Click Import CA Certificate and upload the file.
-
Note: Brother devices only allow 2 CA Certificates at a time. If already full, delete one before uploading.
-
-
After uploading, the certificate will appear in the list.
2️⃣ Configure Scan to Email
-
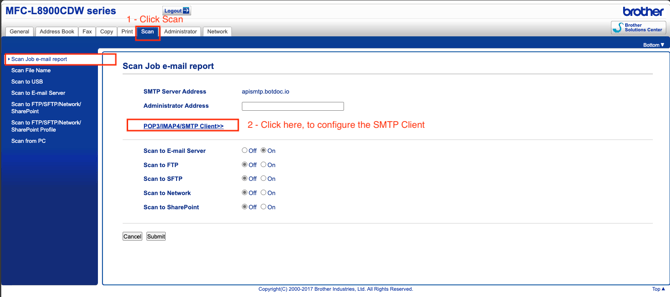
In the Brother Web UI, click Scan → Scan Job E-mail Report.
-
Click POP3/IMAP4/SMTP Client to configure the SMTP client.
3️⃣ Configure SMTP Credentials
-
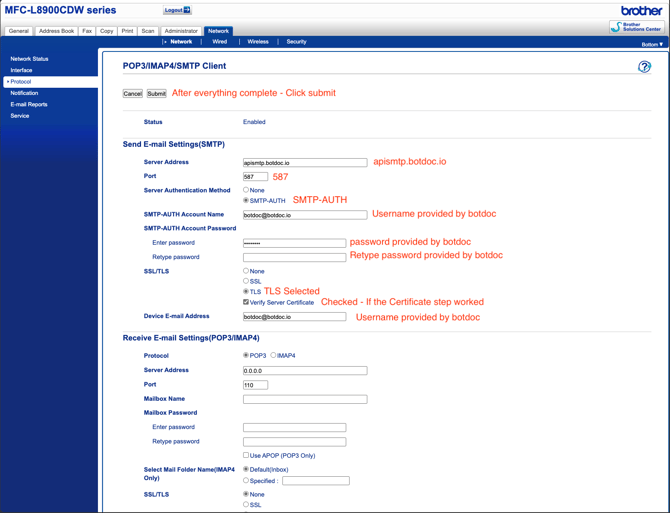
Under Send E-mail Settings (SMTP):
-
Server Address: apismtp.botdoc.io
-
Port: 587
-
SMTP Authentication Method: SMTP-AUTH
-
SMTP-AUTH Account Name: Botdoc username (provided by Botdoc)
-
Password: Botdoc password
-
SSL/TLS: Select TLS
-
Verify Server Certificate: ✅ Checked (if certificate step was completed)
-
Device E-mail Address: Botdoc email provided
-
-
Leave Receive E-mail Settings empty (not required).
-
Click Submit to save.
4️⃣ Test the Configuration
-
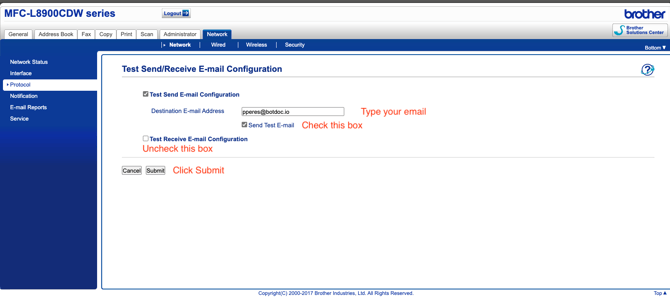
Enter your email address.
-
Check Test Send E-mail Configuration.
-
Uncheck Test Receive E-mail Configuration.
-
Click Submit.
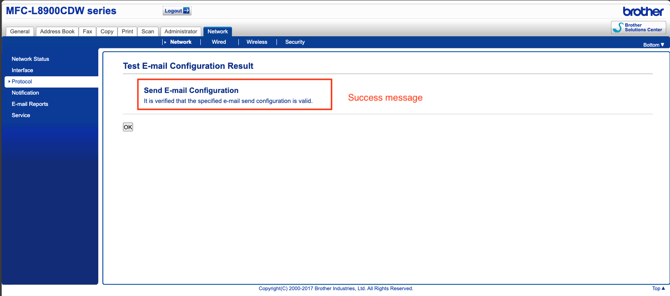
5️⃣ Verify Success
If the configuration is correct, you will see a success message:
✅ “It is verified that the specified e-mail send configuration is valid.”
🎉 Done!
Your Brother MFP is now configured to send scanned documents securely via Botdoc.