🔑 Prerequisites
-
Access to the Canon MFP’s web interface (Remote UI)
-
Administrator credentials
-
Botdoc SMTP username and password (provided by Botdoc support)
- GoDaddy Class 2 Certification Authority Root Certificate file (.der format) - Download at https://aboutssl.org/go-daddy-root-certificates/
Access the Device
-
From your computer browser, navigate to the MFP’s IP address (e.g., http://192.168.x.x).
-
Click Settings/Registration to access the admin panel.

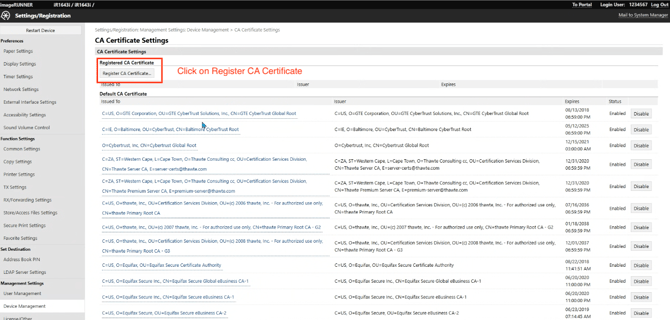
Install the Root Certificate
Before configuring SMTP, the Canon MFP must trust the GoDaddy Root Certificate.
-
Click Device Management → CA Certificate Settings.
-
Click Register CA Certificate.
-
Click Install, then Choose File and select the downloaded GoDaddy certificate.
-
Go to GoDaddy Root Certificates - https://aboutssl.org/go-daddy-root-certificates/
-
Download GoDaddy Class 2 Certification Authority Root Certificate (DER format).
-
-
Click Start Installation to upload it.
-
Once uploaded, you’ll see the file listed (e.g., GD-CLASS2-ROOT.CER). Click Register to finalize.


Configure the SMTP Server
-
In the left menu, go to Function Settings → TX Settings → E-Mail/I-Fax Settings.
-
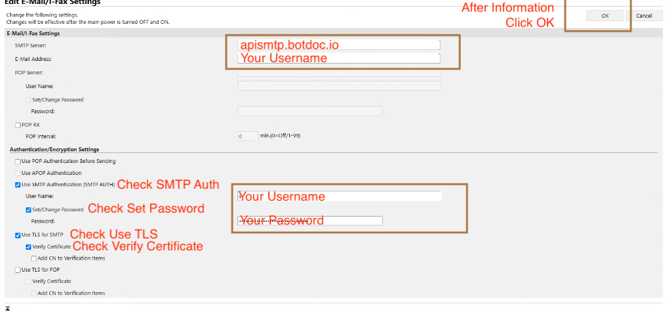
Click Edit to modify email transmission settings.


-
Under E-Mail/I-Fax Settings, enter the following:
-
SMTP Server: apismtp.botdoc.io
-
E-Mail Address: (Botdoc account or sender email)
-
Use SMTP Authentication (SMTP AUTH): ✅ Checked
-
User Name: (Username provided by Botdoc)
-
Set/Change Password: ✅ Checked and enter your Botdoc password
-
Use TLS for SMTP: ✅ Checked
-
Verify Certificate: ✅ Checked
-
-
Click OK to save the settings.
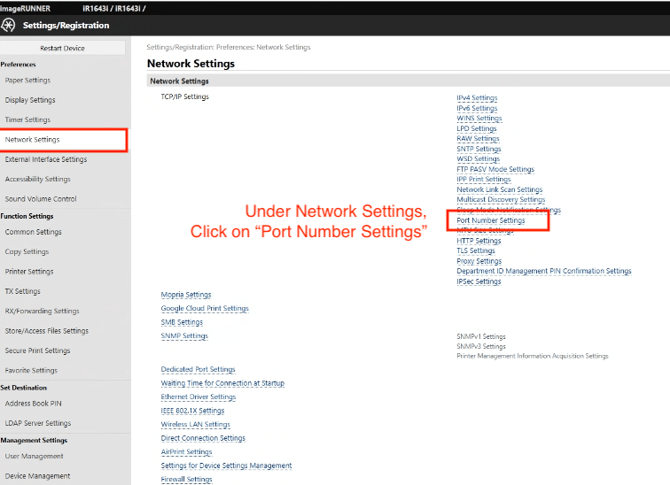
Verify Network and Port Configuration
-
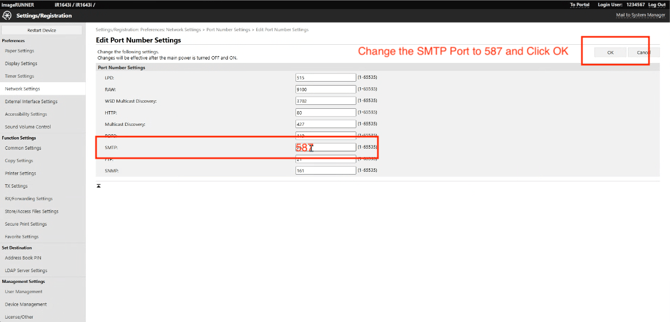
Go to Network Settings → Port Number Settings.
-
Make sure SMTP (587) is open and configured properly.
Final Check
-
Power cycle (turn OFF and ON) the MFP for changes to take effect.
-
Perform a scan-to-email test to confirm successful SMTP communication.
🎉 Done!
Your Canon MFP is now configured to send documents securely through Botdoc SMTP using TLS encryption and a trusted GoDaddy Root Certificate.